Monday, October 29, 2012

Courtesy of Sandy

As I was sitting eating some yogurt on this rainy morning, I realized how much I miss working on my small robot friend TOBL2. Same story as always: school and my innate propensity to occupy my free time with responsibilities. Quick semi-relevant aside: I am loving being a TF this semester! The class just made the transition from the instruction-based part of the semester, to the build-and-test-an-autonomous-hovercraft portion. Already my inbox is being flooded with messages about batteries selection, which sensors to use, how to wire everything up, Arduinos (I know), etc.. In a way this class has curbed my appetite for making things, which is a nice side effect.

Anyhoo, I thought I'd share a video of TOBL2 in his current state. That is, a glorified python-enabled motor controller.


Not my finest cinematography but in the video you can see the directional keys have been mapped to forward, reverse, left, and right. There's a hard-stop function tied to the space bar as well (not shown). In this configuration, there's no speed control (I know booooo) but I will add two keys to increase and decrease speed. A lot of the controller specifics will be tweaked once I get the thing moving and can see what makes the most physical sense.

Speaking of assembling TOBL2, there are two factors impeding that from happening. The first is that no combination of the belts and pulleys I bought seem to work. Even with the nice auto-tensioning, one belt is just way too big and the other stalls the motors from being so tight. I am placing an order for some new smaller pulleys and couple different belt sizes. Selecting those was more scientific that I just made it sound, so hopefully I'll be able to drive this thing finally. The other road block is the wireless issues I've been having. Probably not a big deal, but I don't have much in the way of debugging those issues unless I go to my lab. I'll look into that once I get a working drivetrain.

Welp, thanks Hurricane Sandy for the little break from classes. Time to get caught up on everything else...

Tuesday, August 21, 2012

TOBL2: Press Pause

This past weekend my hard drive kicked the bucket. It's kinda my own damn fault. My external hard drive died a while ago, my computer started wheezing a bit in the Spring, and I didn't do anything about it. But I guess that's what you get for moving around all the time. Hopefully it can be recovered at some point, though it will probably be expensive.

Progress on TOBL2 is at a bit of a stand-still while I resolve computer issues (currently booting Ubuntu off a flash drive w/o a hard drive), finish up my summer internship, and transition from Colorado back to Maryland. But don't fret! It's really quite excruciatingly close to being done. Check it out:


Essentially needs code (old code is now gone :/)and some slight mechanical tweaking to get the tensioning spot on. Next time I'll take it apart and show off some of the cool machining I did last week.

It also turns out Maker Faire extended the Maker application deadline (shock) to this Friday, but it doesn't look like I'll be able to take advantage of that. More likely TOBL1 will be used as a placeholder get to get in the door. Can't do much about a hard drive dying so I'm proud of how far I got. I'll press play again after relocation.    

In the meantime debating updating computers a year earlier than anticipated...
 

Saturday, August 11, 2012

TOBL2: Build Week 2

Sitting down feels nice right now. This week was quite a push to keep TOBL2 on World Maker Faire schedule. If I'm honest, I don't think I'll be able to pull off a fully functioning bot for the August 17th deadline,  because I need to focus on my actually work work. A TOBL2 running the old iPhone controller or maybe a short autonomous program and no servo clutching is definitely still possible. So that's what I'll focus on. But I'm getting ahead of myself, here's where the bot's at after this week.


I tend to stay in the machine shop until the time I need to leave to make up for it coincides with the start of the afternoon mountain rain. Cold, but totally worth it. This week I machined all the mounting blocks which resolve the 90 degree angle between the drivetrain and electronics shelf. Remember the ridiculous custom stainless steel standoffs I made for TOBL1? I suppose these mounting blocks would be the machining analogue to those standoffs. Except machining really small things beats machining stainless any day. By a lot.

Here they are. The two on the left are for the battery tray and the four on the right support the electronics.


The only issue I can spot so far is the taper on the electronics plates from the water jet. The sides of these plates butt up against the motor plates and create a little gap. That's easy to fix.


The motor controller diodes also appear to be impeding one of the servos. That's another easy fix.


Oh yeah, and slightly more troubling issue: the belt appears to be undersized. I need to cut the motor shafts before attaching the outer plates and knowing for sure, but it's looking a bit tight when I just hack it together. The next size up belt has three more teeth so I'll probably invest in a set of those. Don't really need to worry about the slack thanks to the torsion spring tensioners.  

Still left to do (mechanically):

1. Add springs (coming in the mail Monday)
2. Shorten mounting blocks to make way for servo
3. Grind down electronics plates
4. Cut motor shafts, attach outer plates and see if belts too tight (if not skip 5)
5. Replace belts
6. Assemble 
7. Add servo linkage (probably won't worry about that 'til post-deadline)     

It's a bit ridiculous to go through every little mechanical task that needs doing, so ignore that if you like, it's really just a reference for me. This is definitely doable in 5 hour blocks of machining. I'd like to be done with this list by Tuesday, leaving the last three days to wire it back up, get decent code running, and capture the required media for the Maker application. This week we should finally see this thing move! Build week 3 engage.

P.S. Last weekend I moved for legitimately the 5th time this summer. So that's why there's a new backdrop for my pictures every week. I think this is my favorite so far. 

Saturday, August 4, 2012

TOBL2: Build Week 1

Enough waiting around. At the beginning of this week I received some of the last bits and pieces needed to finish TOBL2. Here's what I got:


The parts from the water jet turned out really nicely! Seeing these parts in isolation makes me realize what a bizarre hobby/design sense I have. But, I suppose the endless hours of SolidWorks dimensioning has paid off. The only slight hitch is that Big Blue Saw messed with the dwg file and forgot to include all of the outer plates - those should come in Monday.

Whilst I wait I've had the privilege of full access to an impressively well-equipped machine shop at work. They used to do production in-house so now there's just an overkill shop full of mills, lathes, a wire EDM, a water jet, and so forth. A MechE candy store, if you will. And the guys there are great. Direct quote: "Don't buy any more hardware or material, okay? We have anything you need."  This past week I've been scarfing down lunch and spending the rest of the break in the shop machining.

The first order of business was to clean up those inner plates.


With all those countersinks I tested the motor mounting assembly.


No interference! While playing with this something occurred to me: why the four letter words was I going to use tension springs to tension the belt? The thrust bearings are a perfect place to wrap torsion springs; which is a much cleaner solution. I guess you can't do all your design work in front of a screen.

But before getting too excited a little bit of math is in order. The Hitec HS-45HB feather servos are rated to provide maximum 1N of force for a 1cm arm (i.e. stall torque 1kg-cm). There is an arm on the motor mount too...about 1inch or 2.5cm where the servo will catch it. The motor is about 1.25cm from the point of rotation. On McMaster, the weakest spring that fits around a 5-40 screw is 0.64 in-lbf or 0.072 N-m. Then we do a simple moment balance:

ΣM = 0 = kθ + mgl - FL

θ = (FL-mgl)/k

If we make the safety factor 2, and assume the servo can only output 0.5 N, the spring will overcome the servo at about 1.2°. For safety factor 1 we can get up to 5.2° travel. Somewhere in that range should be enough lift to disengage the belt. If not, coils can be removed to decrease k. Here's a clearer picture of the plan (I realize this is already like plan C):


The next things that need doing are:

1. Clean up the outer plates when they come in
2. Press all the bearings
3. Machine the interfaces between the PCB shelf and inner plates
4. Servo linkage
5. Torsion springs
6. Assemble!

This is the plan for next week. In the background I'll be working on the new controller. I've been learning some python specially for the occasion and am hoping to be competent enough to write a controller that will use keyboard inputs (for now). Another new goal is to have TOBL2 operable enough to get video to submit for World Maker Faire New York. The submission deadline is in two weeks, on August 17th. Presumably I could always enter TOBL1 like last year and then bring TOBL2, but let's see if we can't do this honestly.

Saturday, July 21, 2012

TOBL2: Frame Design Complete!

About two minutes ago I placed my first Big Blue Saw order. This included all* of the missing pieces for TOBL2's frame which will be water jet cut from 1/8" 6061 aluminum plate. I guess one benefit to making everything so absurdly small is that I save some money on these sort of orders. Before shipping it came out to $81.40, which I hear is about the minimum you can pay. I like how Big Blue Saw gives you a preview of what your parts will look like if they were flying through a dessert.


Keeping this guy compact took a lot of changing dimensions, looking at the part in assembly, and then fine-tuning the dimensions further. The motors are mounted to a plate which can pivot, so that eats up a lot of space. The electronics stack also grew a little with the addition of the motor controller board. Altogether though, I'm very pleased with the way it turned out. The center of mass is going to be pretty atrocious, but I'm not ready to start selling TOBLs just yet, so that's alright.


I did away with the three aluminum posts mounted at each corner, and added two shelves. The top one is for the electronics stack (shown transparent) and the bottom one will hold the battery pack (ditto). PCBs should never be structural components, as I'm learning so well at work this summer. In this case, I had to be very creative, since the axles are now live and attaching posts to them won't work anymore. I prefer the old bulky aluminum posts mechanically, but I ordered an extra electronics shelf beam, so I can always put that above the servos if this doesn't cut it. As you can see, I had a little fun with the battery shelf.


Sexy battery tray


A lot of what took so long designing this frame was also anticipating what's going to go wrong. Having a drivetrain with triangular geometery, belts, springs, and moving motors, is really just asking for it - in terms of alignment issues. In an attempt to resolve all this, I put some redundant holes in to allow a little tuning upon assembly. For example, all those holes in the motor bracket are to adjust the spring tension (not easy to see in the picture below).

The drawing geometry and dimensions for these plates are disgustingly complex

 See what I mean? Gross

I also ordered some bearings on eBay, which had no picture, so that's always good. They were a dollar a piece though, so if they're the wrong size then I'm sure I'll create some crazy thing which will need them down the road. The asterisk in the second sentence is because as hard as I tried to make this the entire frame from the water jet order, I'm going to need to machine a few thicker (1/4") blocks at the interfaces of the plates and shelves. These are really straight forward, so hopefully the machinist where I work will be kind enough to let me knock those out some time.

Also, just bought a road bike...so that may have something to do with why TOBL had been moving so slowly recently...

Sunday, July 8, 2012

TOBL: Timers and PWM

Due to shear stubbornness I only brought one suitcase to Colorado. This means no soldering iron or useful tools. All I can do is SolidWorks and software. However, I've been doing a lot of CAD lately so I changed gears and took some time digging deeper into the inner workings of PWM signals. This is what I found:

Hardware, or timer-generated, PWM on AVR chips can be broken into two main categories. There is fast PWM and phase correct PWM. In fast PWM mode, the timer counts up from 0-255 (on 8-bit timers) and toggles the output once the compare register, OCRnx value, is reached. The output starts HIGH and switches LOW when this value is reached, meaning the higher the OCRnx value, the higher the duty cycle or time that the output is held HIGH. The graphs below represent the input sawtooth wave with two compare registers (most timers have two), an output PWM signal running 30% duty cycle, and one at 70% duty cycle, respectively.  
I wrote a MATLAB program to generate these waveforms; it will become more apparent why when explaining phase correct PWM.  
There is however a problem with fast PWM, for certain applications. The PWM signals above emulate the two outputs from a single timer. As can be seen above, the pulses start at the same time but at different duty cycles they do not stop synchronously. This is alright for controlling a single motor or dimming an LED, but for a pair of motors, this introduces error. Say for example there were a drivetrain with two motors, one left and one right (hmm kind of like TOBL). If TOBL were to steer left by running at 50% duty cycle on the left side and 100% on the right for x time, and repeat the other way around for the same amount of time, it would not end up at exactly it's original heading. In TOBL's case, with such a wide track and short wheelbase, this error is amplified. 

Ah hah! There is a solution to this issue called phase correct PWM. In this mode the timer counts from bottom to top and then top down to bottom again, toggling from HIGH to LOW crossing of the compare value on the way up, and from LOW to HIGH on the way down. This process looks like this:
There are a couple differences in these waveforms, starting with the triangle wave input. Because the timer has to count up and down the period of each duty cycle is doubled, or the frequency is halved, making it clear why fast PWM is named as such. You might also notice that now neither of the pulse edges align. However, more importantly, the pulses are centered around the top value. Returning to the two-motor vehicle example,  now using phase correct PWM, if the signal instruction were suddenly stopped, both motors would stop the same percentage of the way into their duty cycle. While this doesn't entirely eliminate the error, it is a lot better than fast PWM.  

On most timers fast PWM is the default and to change it you need to reset the timer/counter control register value to make the switch to phase correct. For the Arduino, which TOBL is based off, this looks like this:

TCCR2A = _BV(WGM20);


...for timer2. Of course there is a lot of other cool stuff to control at this level, so while doing this it may also be of interest to fiddle with the other registers. Setting the two outputs of the timer to non-inverting, the waveform mode to phase correct, and the prescale value to 256 would be this:

TCCR2A = _BV(COM2A1) | _BV(COM2B1) | _BV(WGM20);
TCCR2B = _BV(CS22);


The prescale value is useful because it adjusts the PWM frequency (for fast 8-bit, clock speed/prescale/255 = PWM frequency). So, while I may have cut the frequency in half by selecting phase correct mode, I can do the same to the prescale value to maintain the same PWM frequency. This is less important for motor control and more important for things like servos, which usually run at about 30-50Hz.

Anyways, the point of this tangent is that PWM can be a lot more complex than analogWrite(), and can be easily modified for any application. TOBL2 software now implements phase correct PWM, though I can't do much with it until I get a rolling chassis. If you're interested in the m.file that generated the graphs above, you can get it here. It's fun to play around with and see what's going on under the hood.

Tuesday, July 3, 2012

Blog Web Address Change: You Can't Ride a Fountain

I've changed the URL of my blog from lmh-tech.blogspot.com to ycraf.blogspot.com. When I started the blog a couple years ago I had a few naming ideas that didn't work out, but I wanted to start blogging so I just used "my initials - tech" as a placeholder until something more meaningful came along.

A little bit of history: Shane got me into Team 97 out of Cambridge, MA. We went to Nationals in Atlanta that year but when the competition was over we couldn't stop thinking of other things to build. At this point, the Edgerton Center Summer Engineering Workshop (I think that's the official title) was born. Our first project being this home-brewed segway.

In the process of selecting a project, Ed of the Edgerton Center had some ideas of his own. One which he was particularly adamant about was a fountain like one we saw in Atlanta. He wanted to equip it with sensors so you could run through and either not get wet at all, or get completely drenched. My response to which was "you can't ride a fountain." This went from an inside joke among the ECSEW team and developed into a personal philosophy. I see little point in creating things that don't move (sorry ardWINDo and gMeter) and you'll notice that DIY Segway, CapKart, BWD Scooter, and TinyKart are all things you can ride.

And so, about two years late, I give you: You Can't Ride a Fountain, a blog dedicated to building things that can be ridden and/or move.

Wednesday, June 27, 2012

TOBL2: Fire Day

Today we had what I'm going to call a fire day. It's just like a snow day, except with fire...never thought that was an option but that's what happened. Fortunately, where I work was closed due to smoke/air quality and not because there was nothing left of the place. Going outside wasn't the best option and we don't have a TV to watch Spain vs. Portugal in the EURO, so I spent the whole day playing with TOBL instead!

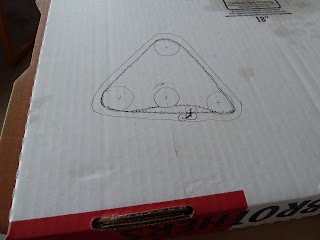
One thing  you don't realize when you relocate for a significant amount of time, is all the little things you're used to having access to. For example, usually when I do any design work I like having paper around to make sure what's in my head can actually be drawn and physically embodied. Well, I don't have any paper here, but we do have some old pizza boxes lying around...

Here was the original idea, of bringing the belt to the motor

And here would be some servo mechanism to tension the belt

What's this, moving the motor to the belt. Is this opposite day? No, it's fire day...

Now whenever somebody says to do envelope calculations, I'm going to do them on a pizza box, so much more room! Anyways, a few minutes into my brainstorming session I realized that my original plan of bringing the belt to a fixed motor was going to be difficult. Initially I wanted to do something like this:


The second spring isn't shown, but if it were the servo would have a neutral point where the spring displacements are equal and thus F1 = F2. This way, the servo could be floating during driving (tension) and the spring (F2) could do all the work. Then, when you need to detension, the servo arm would rotate downwards. However, this gets complicated when trying to load the pin that the tensioner bearings are riding on. This pin would require a slot on both of the plates that sandwich the wheels, and if the spring forces on either side weren't perfectly balanced the pin would tilt and not tension very well.

At this point, I thought back to my real first idea, which was to have the motor on a pivot. I threw out that idea originally because I didn't like having a motor that's not rigid with the frame (and I still don't). Practically though, this is a lot simpler because a motor itself does not rotate like a belt does -you can't bolt anything to a belt. So, that's where my third pizza box drawing comes in, which looks like this in SolidWorks form:

Most of the drivetrain complete 

Better shot of the motor mount plate

View of the drivetrain from the inside where the electronics will eventually sit

This of course had it's own challenges. The primary difficulty was making a robust mounting system for the motor that would withstand the torque from the belt tension on a single pin! To that end, the motor is centered as much as possible so that it's entire mass isn't cantilevered. The plate that carries the motor will serve as one washer of a thrust bearing, the other will be the inner plate, and a matching thrust bearing on the other side. Thrust bearings can take a lot of lateral load, these ones are rated to about 26lbs and were the only ones on McMaster small enough for the task. This picture should clarify what that actually looks like:


In the middle of the frame you can see the darker grey thrust bearings sandwiching the inner plate. To get everything to fit and not interfere (still not entirely done with that) took a lot of geometry and trial and error. Probably took more time to dimension this plate than design all of the electronics.

Not including the servo or supports to keep the inner and outer plates together. 

There are several advantages to this design. Firstly, due to the way the motors are mounted there is more room in the middle section for the electronics and battery to sit. I'm still playing with the tray that will mount all of that but I'm going to do my best to make TOBL2 narrower -this would make driving a lot more controlled. Unlike the original design, I don't have to worry as much about the springs. As you can see above on the shots of the drivetrain in its entirety, there are holes galore on the motor mounting plate, both to accept some sort of turnbuckle from the servo and a spring(s) to maintain belt tension. Having all these mounting options will be important in finding the perfect spring displacement which keeps tension in normal and 60 degree mode, but also isn't too strong for the servo to de-clutch. Next step: figure out the supports which hold the two drivetrains together and carry the electronics. Maybe tomorrow will be a fire day too?

Sunday, June 17, 2012

Summer in Colorado: HardwareHardwareHardware

An embarrassing amount of time has passed since my last blog post. I don't resent that, because I think it just means my life is getting more interesting, so I have had less time to myself. Certainly though, I have missed my secret life as a rogue robot tinkerer, and all the creative stimulation that having projects to work on seems to bring. My six-wheeled friend, TOBL (soon to be TOBL2), has been waiting patiently, yet eagerly in his little box. He's finally about to get some attention!

Box O' TOBL has a pretty nice view. 

Yesterday, I moved to Colorado to spend the summer interning as a hardware engineer...sort of. My first day is Monday so we'll find out what work really entails then. As far as I can tell, I'll be beating some oscilloscopes to death and then when they fail, attempt to figure out why from a hardware perspective. I was told that you're either a hardware guy, and you'll absolutely fall in love with it, or the opposite. I'm hoping for the former.

In a way, I'll learn more about my various robotics projects this summer more so than ever before. Hardware is at the heart of each of them after all. It's also going to be tantalizing working somewhere with so many oscilloscopes, logic analyzers, a machine shop complete with CNC mills and a water jet, pick-an-place machines, clean room, the lot. Surely, I won't have access to any of these nice things for my personal projects, so it'll be a true test of character not to use my keycard to sneak in on weekends.

So, last time I had just got my motor controller boards back and soldered together. There were (and still are) a lot of loose ends to take of for MKI. In the original DigiKey order, I forgot to put in the resistors for the current detection circuit and the ones for the hard-short between the signal and power ground planes. The board has also yet to be hooked up to a scope (this is going to kill me), though this isn't as critical until I get around to the current detection stuff. It would also be nice to take a look at the pwm too, though.

All of the hardware! Arduino board, motor controller, motors, radio, servos, everything.

As for the rest of TOBL2, all of the pieces for the new drivetrain are in but I still don't have a frame. Most likely this will be a water jet piece(s) so that's something I can work on here. Since last time I got some new XBee radios. They're still Series 1 but this time I opted for the chip antenna, which has slightly worse range but should help keep the electronics a little more compact. The old ones I had worked great but were salvaged and had such old firmware that it couldn't be changed. This doesn't matter since they were already set to talk directly to each other. It's nice to have a second set so I can have multiple boards going at once. I updated the firmware and paired them so they're ready to go. I also modified the code so the servos trigger on a new button I added to the iPhone control layout. Though the way I did it would probably make CS people cry.

Well, that's not much of a progress post but all I got for now. Looking forward to summer of hardware and outdoorsy things!

Tuesday, January 24, 2012

MKI: First steps

Yesterday three MKI boards came in the mail and today two motors were driven by one MKI board. I'm very pleased with this controller so far because whenever it doesn't do what I want it to, it turns out it's my fault and not its; which is great! Let me explain...

Top

Bottom

MKI was easy to solder together, despite having no solder mask. The trickiest part was actually preparing XPWMShield. To accommodate a motor controller upstairs, the 5V regulator was just too tall and had to be bent down; which also meant putting the battery input terminal on the bottom. In addition, two of the servo pwm inputs were flipped (to eventually incorporate servos). All power is passed through a temporary splitter that supply the boards individually. When TOBL2 comes together I'll make a nicer connector.

Soldered

Shield mode

Once it was all together I ran into a slight problem with motor A. With no solder mask I shorted a small gap by one of the diodes which meant the motor would run fine and make the L298 burning hot in the other. After a few tests runs - being oblivious to this problem - it still works fine so the stock heat sinking does a great job, which was a concern given there is no space on the board to add heat sinking. Here are the motors running through a quick forward and reverse ramp program:


In getting to this stage I learned some subtleties about the L298. For example, I forgot to mention why the motors took their first steps today and not yesterday. In the datasheet ST says "The sense resistor, not of a wire wound type, must be grounded near the negative pole of Vs that must be near the GND pin of the I.C." Maybe it's just me but this doesn't get across the same message as "The current sense pins must be connected in some way to ground for the motors to work!" -which I found digging though forums. Until I get small enough resistors there is a wire in their place to keep the controller happy.

It's also important to note that for now at least, the regulator I had planned to use is bypassed by a wire, supplying 7.4 uncensored volts. It was hard to find a regulator with a low enough differential between input and output voltages to be efficient. Essentially with the current 2S pack I'd need a 4V regulator to support the voltage overhead and voltage loss during use. This would mean dissipating (read: wasting) a stupid amount of power. Combined and unloaded the motors draw 10mA times 3.4V loses only 34mW. However, during loading and more extreme conditions 2A is feasible which would be a 6.8W loss; which is quite significant! We'll see how it works without a regulator for now...glad I was talked out of it.

Next steps are to test the current sensing and implement my iPhone controller setup. Classes start tomorrow. Boooo.

Friday, January 13, 2012

MKI: Motor Controller

At some ill-defined point in time routing becomes art, I think. I've spent the greater part of the last week transforming that schematic from my last post into the pretty pictures you will see below. It's my first motor controller so I don't want it to suck. Call it MKI if you like (i.e. motor kontroller one or MKI like the VW GTI). The point is I've hung around Shane too long and am beginning the motor controller phase of my life; which is sure to see many iterations.


This first - shield - controller is being produced for TOBL2 and is therefore stupid compact. I know this because routing was a beach. It's contained within a 1.65" x 1.85" form and will plug directly into the headers on XPWMShield I created last year.

MKI has some things that I'm proud of:

There are isolated ground planes on the bottom layer of the board. This technique was suggested by Shane, of course. The logic pins are tied to a ground plane (SGND) which is only connected to the main power ground plane (PGND) by an 0805 resistor. This resistor is sized such that it will explode when too much current is drawn, acting like a fuse to protect the current-sensitive pins on the logic end. In this case running at 6V and fearing 2A gives a 3ohm resistor.

Power ground plane.

Signal ground plane.

Each motor has three diagnostic LEDs. One to indicate forward, one for reverse, and another for over-current. The latter I cannot tout until I write the software for the controller. This LED is not connected to the actually current sensing pin but will use feedback from it to illuminate. More on that once I have a board to test.

It's not visible now but originally several traces wove through the seven-pin header; which the DRC did not like. Moving these traces basically meant ripping up half the wires and starting fresh...#firstworldproblems. (<-- first and last time I will hash tag...yuck...Twitter)

Things I'm not proud of:

Looking at the images above the ground planes are pretty well-contained save for a few wires that need to reach the top header. We'll see if any noise results from this, shouldn't be too bad.

There are 50 f***ing vias. On a via/area basis that isn't bad at 16.4/in^2. However, this board is being ordered 4pcb Bare Bones which allows 35/in^2 maximum, and I'm sure you could pick a given 1" x 1" where that is the case. Hopefully they don't check that so carefully but regardless, that is a shameful quantity of vias.

Switching to the mechanical realm the Robot Marketplace order is in and I suspect so is the McMaster order. In addition I have been working on the frame design. Don't believe me?

Boom.

This wasn't meant to be in the "things I'm not proud of" section but now that I think of it I'm not proud of how little attention the mechanics have received. Maybe I can make it up by over-engineering servo-automated belt-tensioners...

Wednesday, January 4, 2012

Space Invaders and Motor Controllers

The first order of business to address in buildapalooza is TOBL2's motor controller -that way the new chassis can be built while the board and parts are being shipped! This is the first motor controller I've designed and it's based off of the L298 Dual H-Bridge, PowerSO 20 package. Essentially it's an Arduino shield...shield, because it will stack onto XPWMShield. Here's the schematic:


Actually this is the schematic, but it does kinda look like the Space Invaders alien:


It will drive TOBL2's two new FingerTech motors at 6V, which promise not to ask for any more than 2.6A combined if both motors stall. The L298 is rated to handle up to 4A, but to be safe the current sensing pins will be in effect and there will be more status LEDs than one could ever need. Oh, and automated belt tensioning/detensioning....yeah I really don't want any more slipping or breaking (which were all part of TOBL1's charm). More details on the controller once I have a physical controller in my hand to test. Just a little amuse-bouche before the feast of blogposts and building commence.