
Sunday, October 9, 2011

Friday, August 19, 2011
gMeter: Electronics
The electronics for this project are simple. So I asked myself, why spend money on a board from Advanced Circuits when I can make my own? After completing the etching process I have plenty of answers to this question, which I will address on a rolling basis.
First, the circuit itself. Laying a board out for single-sided etching adds some headache to the design process. Without vias you have to think a little harder about trace traffic, to minimize using jumper wires. It's a fun game until you realize that's probably something they play at EE parties. I scored a 7 (I think it's like golf). Other modifications for achieving etch-spec: minimum trace size of 24 mil and minimum clearance up to 16 mil. I really wouldn't etch a board that's any more complex than this unless the form factor is less constrained and bigger.
 Export to png (monochrome) and...

 Export to png (monochrome) and...

...ready to be printed.
There are hundreds of DIY PCB etching tutorials out there so I'll spare you the step-by-step procedure. Besides, after etching one board I'm far from pro! I went the iron-on toner transfer route, messing up three blank boards before getting one that was "etchable." Partially that was not my fault because the laser printer I used was good but not great, leaving thin spots of toner here and there. Mainly I wasn't putting enough pressure on the iron. To get it to work, I literally put all of my weight on the iron for two minutes solid. Then 4-5 minutes moving the iron around giving the interior a lot of attention, and still maintaining absurd pressure.
 I used a sharpie to touch up the spots the toner missed.
 I used a sharpie to touch up the spots the toner missed.
The etching part is where things got really sketchy though. The copper took at least 45 minutes of continuous agitation to etch...? That's at least 15 min longer than what I read online, so I'll need to hunt down the ferric chloride MSDS, perhaps it was diluted more than usual (around 60%). More likely rubbing it with a sponge probably would have cut the time, instead of waiting for the copper to dissolve on its own. As much work as this is, there is an unbeatable zero day lead time and low cost. Having the ability to wake up with an idea for a cool board and use it that day is plain awesome. With practice I'm confident it will take less time and it's far superior to leaving your project at breadboard status.
 Soaking in ferric chloride...
 Stipped of toner courtesy of spray carb cleaner

 Soaking in ferric chloride...
 Stipped of toner courtesy of spray carb cleaner

Finally got some use out of my Dremel drill press, I think this is what it was designed for.
Next, I soldered it all together and bam....no, who am I kidding it didn't work first shot. Again, I would advise against etching with 24 mil traces, especially in confined spaces. I made this mistake and spent a lot of time with a multimeter and an x-acto knife peeling up traces to resolve about ten different shorts. Finaly I got it to light up.


Ok, the board works. Now there are zero excuses left to procrastinate from coding. Well maybe that classes start next week, but I will do my best not to drag this project too far into the semester. Putting on my software hat...


Ok, the board works. Now there are zero excuses left to procrastinate from coding. Well maybe that classes start next week, but I will do my best not to drag this project too far into the semester. Putting on my software hat...
Monday, July 25, 2011
gMeter: ...
Oops, it's August and gMeter is very incomplete. That's probably because the part I really care about (tangible mechanical things) are not the important part. Alas, progress has still been made and to satisfy the self-imposed minimum project SolidWorks/machining time, I came up with a cool sheet metal enclosure. I've never made one before, but SolidWorks has a great tool for laying them out, with a nice "flatten" tool to get a drawing of the part for construction. Got all the materials, time to cut, mill, and bend!


You'll notice a right flange is omitted, motivation for which will become more apparent later. Out of context, I'll admit, it's not very exciting. Especially following my last project, which could do wall flips! Though, anyone who has ever programmed a microcontroller will appreciate the inherent awesomeness of that itself. Which brings me to my next point -> electronics.
The board containing the logic and everything else is ready for fabrication. I'm going the DIY route and etching it tomorrow, so look for an electronics/etching post soon. I used an Arduino Nano to prototype everything before porting it all over to the ATtiny2313. This would have gone a lot quicker if I hadn't fried the regulator on the Nano and consequently the not-so-cheap ADXL335. Fortunately the Nano still runs off of USB power and a brave friend has loaned me an accelerometer. I look forward to having a nice clean pcb to replace this sea urchin looking setup.
 I need to invest in normal-sized breadboards.
The board containing the logic and everything else is ready for fabrication. I'm going the DIY route and etching it tomorrow, so look for an electronics/etching post soon. I used an Arduino Nano to prototype everything before porting it all over to the ATtiny2313. This would have gone a lot quicker if I hadn't fried the regulator on the Nano and consequently the not-so-cheap ADXL335. Fortunately the Nano still runs off of USB power and a brave friend has loaned me an accelerometer. I look forward to having a nice clean pcb to replace this sea urchin looking setup.
 I need to invest in normal-sized breadboards.
On the flip side of all this procrastinating, my attention has been finely concentrated into the sexiest thing on four wheels. In our 5th year of ECSEW, the tinyKart is a sub-50lb e-cart you can essentially wear. The idea being to make it lighter than a single battery from the original cap kart, circa 2008. Mainly this is done through prevalent, if not exclusive, use of 6061 aluminum. Without a driver it will have a better power-to-weight ratio than a Lotus Elise, with a -healthy- driver the figure is more comparable to an E92 BMW 328i. I say will because as you can see it still needs to be wired up. More to come on that and gMeter very soon as the August building marathon begins! Leaving for school in 11 days, bring this.
Tuesday, June 14, 2011
Grand Prix du Canada, done right.
The past weekend marked the only North American stop on the Formula 1 calendar - until 2012 at least - held at Circuit Gilles Villeneuve in Montreal, Quebec. The circuit skirts tiny Île Notre-Dame and features some famous corners, including a hairpin and one named after racing deity Ayrton Senna. The course is a driver's favorite although this year's GP may have temporarily spoiled that sentiment, due to an unprecedented 2-hour rain delay. Quick recap: Mercedes Mclaren's Jenson Button stole what would have been another victory for Vettel, in lap 70. Out of 70! Button deserves the credit though, working his way from dead last at one point, making up for many pit stops, a tussle with team mate Lewis Hamilton, a speeding violation (they have those), weather etc. Also of note, is a 4th place finish from Shumacher, who is on the rise in his second season back from retirement. Hamilton, who has been successful here historically, was forced to retire. Kinda had that coming to him. Anyways, the point of this post is to shed some light on what to expect at a GP and how to do it right, and cost effectively.


Number three: BYOR (bring your own radio). Being at a Formula 1 race is kind of like observing a golf tournament from the 9th hole. Unless you can cover a lot of ground really quickly (~200mph), or are willing to shell out hundreds for seats you will have no idea what's going on. Alternatively you can camp out by a screen but you will be hard-pressed to do so unless you get there seriously early. No matter what time you arrive, you will be able to see the action, though. The earlier the less likely you will be looking through a tree.

Final tip: Pick your transportation wisely. Having a car is essentially useless because there is nowhere to park and there is a metro stop which lets you out right at the front gates of the track. I say this with somewhat of a bias after my car suffered a freak break-down, costing me a couple thousand dollars more than I had planned to spend in one weekend. Even still, there are metro stops scattered all around town and buses to take you to the stations, if you can catch them. Busing up is definitely the most reasonable way to go, $75 one-way from Boston at least, which is currently what you would pay in gas anyways.
Even if you do not follow Formula 1 going to a race is an incredible experience. The sounds of howling V8s revving to 18,000rpm and the brutal shotgun-esque downshifts alone are worth the price of admission. It truly is a symphony but watching the race unfold you realize that this sport does not exist solely for our entertainment. It is a business and a showcase of modern engineering for the companies who sponsor the teams. The cars have presence, they command your respect. Watching the drivers chase down the car in front of them is like watching a really loud game of chess. As was the case with Sebastian Vettel the simplest mental error can lose you a race. The Montreal atmosphere is great too, the locals get really into it and appreciate every ounce of heroic late-braking and high-speed overtaking. I highly recommend the Canadian Grand Prix to anyone and will certainly be back next year, definitely smarter, hopefully dryer.
Saturday, May 28, 2011
gMeter: l'introduction
Preface: As mentioned in the previous post I hit some car trouble in Canada. Actually I had an engine swap, so it's more like a major problem. Between fatigue, sorting that out, and another project in collaboration with ma man Shane, this project is off to a slow and undocumented beginning. To that end, here is an intro while I chip away at the project.
For the longest time I've been interested in doing something with inertial sensors. It's no secret that I am also a car-obsessive, so the logical starting point was to create a g-meter for my car. Does it tell you how "G" or ghetto someone/thing is? No, but later versions may feature a cockometer setting to tell you "how much of a cock you look." Of course, a g-meter measures the lateral cornering force of your car, typically in units of gravities. As a basic reference an average street car can handle just under one gravity, and a formula one car will stay planted while pulling nearly five g's! "How many can the Volvo manage?" I wondered. Time to find out.

Image courtesy of TheEngineersCorner.

The most critical component of this project would be the accelerometer, for which I chose the tried and true 3-axis ADXL335, yours with breakout board for $24. Having no prior experience with accelerometers and no qualitative evidence for comparison I think this is a great sensor. I used it as it came, with 0.1uF decoupling capacitors which restrict the bandwidth to 50Hz. Choosing the bandwidth is a compromise between noise and resolution and the stock setup proved a good balance thus far.
For starters the sensor needed to be calibrated by picking an accurate scaling factor. This is a number in units mV/g which converts the output signal from volts to gravities. The ADXL335 is ratiometric so the data sheet provides experimental values for the scaling factor at the max and min supply voltages. Running the sensor off a 3.3V line I needed to determine the SF in between the given values, which meant linear interpolation. Not the best since clearly the response is not linear, but close enough. To confirm this I devised a shotty test by taping a breadboard with the accelerometer and an Arduino to my dash as a brave friend riding shotgun read the x (lateral axis) outputs off my laptop in realtime. Meanwhile, another friend monitored readings from a free app on my phone and I drove fast (safely, Mom) down a windy road. The results were reasonable, achieving a max of about 0.74g on a particularly tight bend. During this test power was being supplied via USB so I will need to tweak the SF once the power source is finalized, probably a small 2S LiPo.
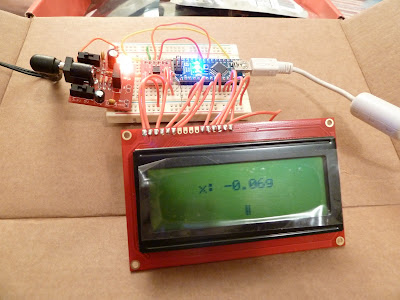
Quick and dirty g-meter.
This all came together frighteningly quickly. I added an lcd to the mix but even that has a very common HD44780 chipset and pre-made Arduino library of course. I did not like this, and I started to feel guilty about all this Arduino business. Using them is kind of like admitting that you like Britney Spears music...or something. It's just not hardcore. Arduino's are great tools and by no means have I come close to mastering all of their capabilities, but building things shouldn't be like one of those snap-together model airplanes. So instead of soldering what I had together and stuffing it all into a box, it was time to take the project down a windier and potentially bumpy path.
If we're going to dabble in such terrible things as software, then we ought to at least do it right. Enter the AVR ATtiny2313, a very popular microcontroller for small custom applications like this, and most importantly, no Arduino bootloader! In fact, that is the last time I will use the "A-word" in this post. It feels liberating now but pretty soon I'm sure I will begin kicking myself. I bought an AVR ISP II and put together a little target board. In the next few weeks I will work on the software, anticipating that the lcd will probably be the hardest part. No turning back now.

Unnecessary switch, led, and cap. Why not.
After the recent car bill I need to be thriftier than ever. For the circuitry I won't be ordering a shiny new PCB, instead I am researching the process of etching one myself. Failing that look for a perfboard from Radio Shack with a lot of wires. Mechanically, all I can say is I've ordered some 1/16" sheet aluminum...
Monday, May 16, 2011
< Summer Projects >
While studying for finals I realized something, and that is procrastination, NOT necessity, is the mother of invention. With the dark cloud of exams looming overhead my mind naturally started generating ideas for the more exciting ways I could be spending my time. Now that they are over* my ideas are rapidly coming into fruition.
Motors Controllers:
After working with servo's for far too long, I bought some TI SN754410 quad half H-bridges and Sparkfun's cheapest motor, which turned out to also be their smallest! I wrote a quick Arduino/Processing sketch and touchOSC layout to integrate my iPhone control process to this tiny motor. It's very straight-forward, just PWMing the enable pin to control the speed. This was a success.
More recently, a friend handed me a hard drive spindle motor after realizing that a battery and wires alone could not bring it to life. It even has four wires, "what could the extra two do?" he might have asked. I knew it must be brushless and after a little bit of research, it turns out it's a 3-phase BLDC. There is one wire for each phase and the fourth is common. In a trial by fire effort I am in the process of building a controller with some parts I had lying around.
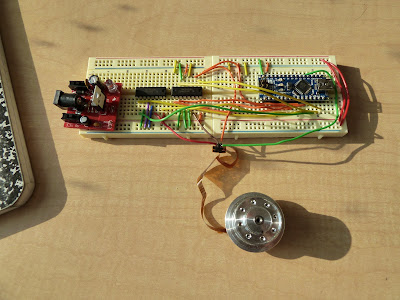
The basic idea is to drive each of the phases with one side with one, or one half-bridge. Thus two SN754410s are used. The Arduino Nano provides the PWMing for the three enable pins, the inputs for the six logic pins, and the back-EMF sensing. The latter will be the tricky part, and I am still doing some reading to determine the best way to do that -both in hardware and software. This is a sensorless motor, meaning instead of onboard hall-effect sensors the position of the rotor is approximated by detecting the back-EMF. Not any easy undertaking, and for now just a clusterfuck of wires.
In the background -or maybe the foreground- another project is in the making. Today I ordered a 3-axis accelerometer and a 20x4 LCD. I've had an itch to start working with inertial sensors for some time and I think I've found the perfect application. Hmm what could those be for? Hint: my car.
*one non-engineering final left
Thursday, April 7, 2011
Something Different
There's more to life than building things. Please enjoy this semi-serious cover of John Lennon's Imagine with my friend Seti on vocals and me with the keys.
Subscribe to:
Posts (Atom)